Star Trails with the Nikon D780
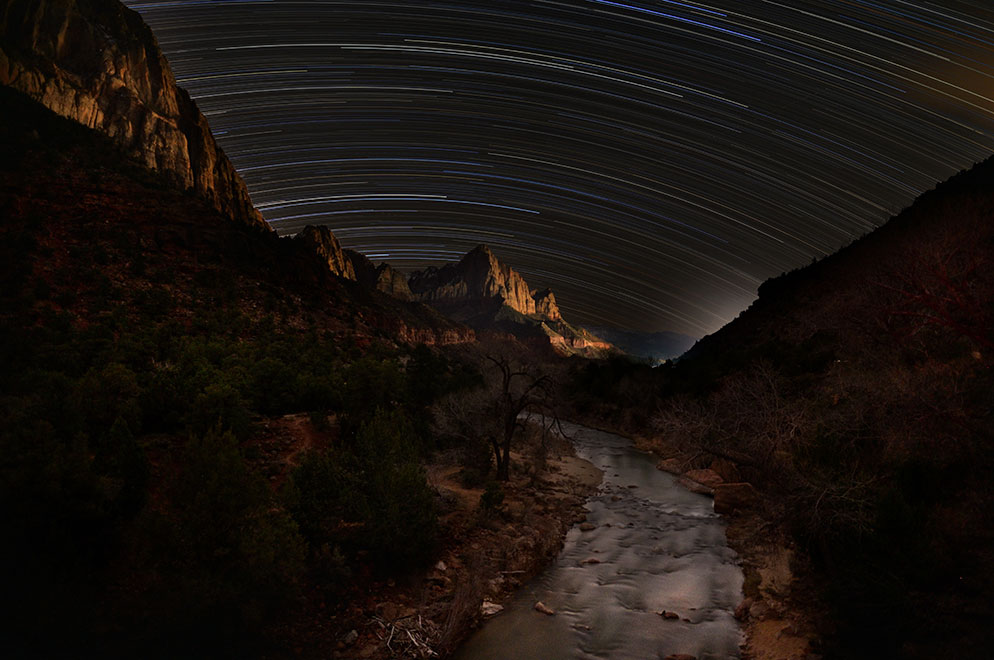
Star Trails over Zion National Park. - D780 and AF-S NIKKOR 20mm f/1.8 lens on the camera, mounted on a tripod. Foreground Exposure: 100 seconds, f/1.8, ISO 1000, manual exposure, long exposure noise reduction ON, high ISO noise reduction OFF, white balance: 4350°K, Flat Picture Control which allows for the maximum dynamic range and the most wiggle-room in post-processing. Stars Exposure: 180 seconds, f/4, ISO 200, manual exposure, long exposure noise reduction OFF, high ISO noise reduction OFF, white balance: 4350°K, Flat Picture Control. The 46 three-minute images of the stars moving across the southern sky were brought into StarStax software. the completed stack was brought into Photoshop Elements to merge the layers.
If you’ve ever wondered what a Nikon Rep does with his or her spare time, I’ll tell you. A lot of us look through a new camera’s manual, find a feature that sparks something within us, and then we go out and figure out how to make some—hopefully—great images!
In this case, I was nearly bubbling with joy when I saw that the D780 had a feature only found up to that point in the Nikon D810A. The D780 would be able to extend available shutter speeds in manual exposure to 900 seconds—that’s 15 MINUTES! And that means Star Trails.
Unlike the film days where you opened the camera’s shutter for one extremely long multi-hour exposure, today’s modern digital cameras use a series of shorter exposures that are stacked during post processing in order to create a single finished image.
The D780’s extended manual exposure is a wonderful tool to make this process of creating star trail images easier.
Most cameras have a limited shutter speed of just 30 seconds in manual exposure mode. But the number of shutter actuations can climb pretty fast. Just consider that a typical star trail image will require a minimum of two hours. Some of my favorite captures have required well over three hours of capture time! At 30 second exposure times, the shutter opens and closes twice a minute, that’s 120 times an hour and over 350 actuations per image. With an exposure extended out to 900 seconds, the shutter count drops to a mere four actuations per hour.
In order to activate the option that allows for extended shutter speeds in manual exposure, go to the CUSTOM Menu item D6. Turn ON D6. The readout for the shutter speeds when in manual exposure mode only no longer stop at 30 seconds. The D780 will now show shutter speeds of 30, 60, 120, 180, 240, 300, 480, 600, 720 and 900 seconds.
The D780’s extended manual exposure is a wonderful tool to make this process of creating star trail images easier.
Road Trip!
With the D780 and AF-S NIKKOR 20mm f/1.8 lens in my hands, I set out for Zion National Park. A glance at the DarkSiteFinder.com website assured me that Zion possessed a pretty dark sky, and a check of the calendar, told me that the day I chose was near a new moon cycle so moon light would be at a minimum.
While I’ve done these types of shoots alone, I always try and bring a friend along since It’s smarter not to be out there alone. Luckily, a couple of my fellow Nikon reps. think standing outside in the middle of a cold dark night is fun so together we trekked to Zion.
It should be noted that we did do a bit of additional planning and preparation prior to arriving at the park. The weather was forecasted to be spotty at best. The area near Zion was expecting a mix of rain, snow, clear skies and temps as high as 80 degrees during the day would be paired with an evening chill down as low as 20 degrees. Clearly boots, waterproof insulated jackets were going to be packed as were many layers that could easily be peeled off after the sun came up. Hats, gloves, and hot chocolate were going to be standard issue for the evenings.
We scouted locations during the day. The primary location we choose had several things that we really liked. First it offered a clear view of both the northern and southern skies. A clear view of the sky is something you need to consider when making images in a canyon. We liked the foreground and It was easy to access. No need to hike down a trail at night, in the dark, in the cold, trekking across freshly fallen snow, laden with gear.
Steps to determine exposure
When building this type of image it really helps if you have an idea of what you want the final image to look like. In this case, I wanted the foreground exposed enough to see some detail, but still look like it was shot at night. That set the exposure at 180 seconds, f/1.8 at 1000 ISO. While there was the glow from a nearby city in the shot, it worked out adding an unexpected dimension to the final image.
Now all I had to do was to record the stars as they moved across the sky. I’d recently read that star light picks up faint shades of color as they pierce our atmosphere. This meant that many of my early attempts at star trails which resulted in white or near white trails were overexposed.
So I played around with different settings and discovered that if I kept the 180 second exposure I used for the foreground, stopped down the aperture to f/4 and set the ISO to 200 my test shots showed stars with a slight blueish hue.
The camera was set to record images with the JPG + NEF option, which I'll do when trying a new technique or using a new camera. Ideally, I'll use the finished JPG files, which I did in this case.
For the series of captures of the actual trails, I used the built-in interval timer mode in the D780. The exposures were 180 seconds, so I set the interval to 181 seconds. That meant the camera would start a new interval (a new image) one second after the previous image finished its exposure. A one second gap every three minutes would render pretty smooth looking trails with only minor gaps in between.
Foreground Exposure: 100 seconds, f/1.8, ISO 1000, manual exposure, long exposure noise reduction ON, high ISO noise reduction OFF, white balance: 4350°K, Flat Picture Control.
Stars Exposure: 180 seconds, f/4, ISO 200, manual exposure, long exposure noise reduction OFF, high ISO noise reduction OFF, white balance: 4350°K, Flat Picture Control.
The 46 three-minute images of the stars moving across the southern sky were brought into StarStax software. Its free and runs on both Mac and Windows computers. Once the sky stacking was finished, the completed stack was brought into Photoshop Elements. Next a new layer was created and the foreground inserted into that layer. The layers were merged so that the foreground was now visible. A bit of exposure and color correction and the final image was complete.


